Sections
Related Tutorials
- Create a Physical Count
- Physical Counts
Overview
Physical Counts, also known as Cycle Counts, are Tasks for workers to take a count of each specified item in your Inventory.
The Create Physical Count section allows you to set up a new Physical Count.
From here you can...
Main Screen Layout
The Create Physical Count section is divided into two parts: the Basic Information Editor and the Count Details Editor.
1. Basic Information Editor
This is where you set basic information about the Physical Count.
2. Count Details Editor
This is where you set the details of your Physical Count.
Basic Information Editor

| Code: | The LookUp Code for your Physical Count. The system generates a code, but it can be overwritten. |
| Warehouse: | The Warehouse in which the Count will take place. |
| Status: | The Status of your Count. |
| Description: | A free field in which to input a description of your Count, if desired. |
*Those in red are required fields.
Count Details Editor
Location Filter
The Location Filter allows you to narrow the Physical Count to certain Locations.
From the Filter By drop-down list, you are able to select one of three options:
- None: The Count will include all Locations.
- Specific Temperatures: The Count will only include Locations that are under the specific Temperature Categories you have selected. There will be a list of all Temperature Categories you have set up in your system (see: Setting Up Temperature Categories); put a check mark in the box of each Category you'd like to include.
- Specific Locations: The Count will only include the Locations you specify. By clicking the Add button, a pop-up window will open, in which you can select the Locations you'd like to include by putting a check mark in the box next to it. The Remove button will remove the Locations you have selected in the list.
The Count will include all Locations with the Tags you specify. There will be a list of all Location Tags you have set up in your system (see: Setting Up Tags). Put a check mark in the box next to each Tag you'd like to include in your Count, and each Location with one of those tags will be included.
The Count will include Locations that have had a specific Operation occur in it a certain number of time during this month. A drop-down list lets you select an Operation Code to search by, and then you can set a range of occurrences by placing a lower and higher value in the Between _____ and _____ fields, respectively.
You also have a few final filtering options:
- Only empty Locations: Your Count will only include Locations without any Materials in them.
- Include empty Locations: Your Count will include Locations without any Materials in them, along with stocked Location.
- Skip Hard Allocated Location: Your Count will not include Locations that are being used for storing Materials that are Allocated for Shipments.
- Skip Locations containing Release Count: Your Count will not include Locations that already have a Count scheduled in them.
- Number of days since last Count: Your Count will include Locations that have had a Count occur in them at least the specified number of days ago, or longer.
The Material Filter allows you to narrow the Physical Count to certain Materials.
From the Filter By drop-down list, you are able to select one of seven options:
None: The Count will include all Materials. Specific Temperatures: The Count will only include Materials that are to be stored in the specific Temperature Categories you have selected. There will be a list of all Temperature Categories you have set up in your system (see: Setting Up Temperature Categories); put a check mark in the box of each Category you'd like to include. Specific Owner/Project: The Count will only include Materials Owned by a specific Owner, and categorized under a specific Project. Select one or both from the drop-down lists. Specific Material Groups: The Count will only include Materials under specific Material Groups. By clicking the Add button, a pop-up window will open, in which you can select the Material Groups you'd like to include by highlighting them and clicking the Add button. Once you've selected all the Material Groups you'd like to be included in your count, click the OK button. The Remove button will remove the Material Groups you have selected in the list. Specific Lots: The Count will only include Materials under specific Lots. By clicking the Add button, a pop-up window will open, in which you can select the Lots you'd like to include. First, select an Owner and a Project from the drop-down lists and click Search, then add Lots by highlighting them and clicking the Add button. Once you've selected all the Lots you'd like to be included in your count, click the OK button. The Remove button will remove the Lots you have selected in the list. Specific Vendor Lots: The Count will only include Materials under specific Vendor Lots. By clicking the Add button, a pop-up window will open, in which you can select the Vendor Lots you'd like to include. First, select an Owner and a Project from the drop-down lists and click Search, then add Vendor Lots by highlighting them and clicking the Add button. Once you've selected all the Vendor Lots you'd like to be included in your count, click the OK button. The Remove button will remove the Vendor Lots you have selected in the list. Specific Materials: The Count will only include specific Materials. By clicking the Add button, a pop-up window will open, in which you can select the Materials you'd like to include. First, select an Owner and a Project from the drop-down lists and click Search, then add Materials by highlighting them and clicking the Add button. Once you've selected all the Materials you'd like to be included in your count, click the OK button. The Remove button will remove the Materials you have selected in the list. The Count will include all Materials with the Tags you specify. There will be a list of all Material Tags you have set up in your system (see: Setting Up Tags). Put a check mark in the box next to each Tag you'd like to include in your Count, and each Material with one of those tags will be included.
You also have these final filtering options:
- Standard Cost Between: Your Count will include Materials that cost between the two set Values.
- Standard Price Between: Your Count will include Materials whose price is between the two set Values.
- Unit Count Between: Your Count will include Materials of which you have the specified amount in your Inventory.
The Inventory Count Settings tab allows you to enable Inventory and/or License Plate Counts, choose how Count Tasks should be grouped, and gives you the option of setting each different level as Blind, so that the user performing the Count will not have the system totals displayed for them.
You can also choose to have the user enter each counted Serial Number or License Plate LookUp Code by putting a check in the Request Serial Numbers for Serial Materials or Request LookUp for License Plates box. The user will still be required to enter Serial Numbers/License Plates regardless of these settings if there is an inconsistency.
The Schedule Details tab is where you determine how often the Event occurs.
Make sure to put a check mark in the Enable box to activate the Event, otherwise it will not occur.
The Schedule Type from the drop-down list sets whether the Event will occur just once, or multiple times.

You can select the Date and Time at which the Event will occur.
The Frequency determines how often the Event recurs:
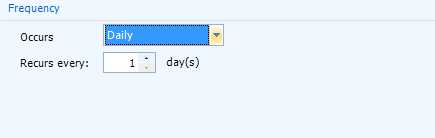
You can set the number of days between each occurrence of the Event.
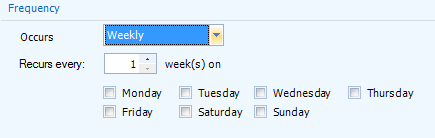
You can set the number of weeks between each occurrence of the Event, and the day of the week on which the Event occurs.
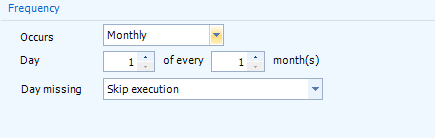
You can set the number of months between each occurrence of the Event, and the day of the month on which the Event occurs.
Day Missing: If the day of the month you selected for the Event to occur on does not occur in a month, you can choose whether to skip the Event for that month, or move the Event to the last day of the month.
The Daily Frequency determines at what time of day the Event occurs, or how often during the day it occurs, occurring every so many hours, minutes, or seconds, and beginning and ending at what times of the day.
The Duration determines over what period of time the Event will be active. Leaving the End Date blank will allow the Event to recur indefinitely.
The Count Tasks section is where you can review the completed Counts. The Cancel Selected Tasks button is used to cancel Tasks once they have been populated in the Count Tasks List.
The Count Tasks tab is divided into three areas:
This is where you search for the Tasks to review.

Status: Select the Status of the Count Tasks from the drop-down list. Contains Discrepancies: Put a check mark in this box if you'd like to view only Tasks with discrepancies, leave it blank to view only tasks without discrepancies, and put at solid block in the box to display both. Contains Recounts: Put a check mark in this box if you'd like to view only Tasks with Recounts, leave it blank to view only tasks without Recounts, and put at solid block in the box to display both. Created From: Specify a date range in which the Count Tasks were created. Completed From: Specify a date range in which the Count Tasks were completed. Once you've entered the appropriate criteria, click the Search button. The Cancel button will cancel the search while in progress.
Once you've search for Count Tasks, any that exist matching the Search Criteria will populate in the Count Tasks area. Clicking the + icons to the left of the Task Create Dates will show each Task grouped there. Tasks with discrepancies will be highlighted in red, Tasks that have had Recounts Released for them will be highlighted in blue, and Tasks that have had all discrepancies Resolved will be highlighted in green.
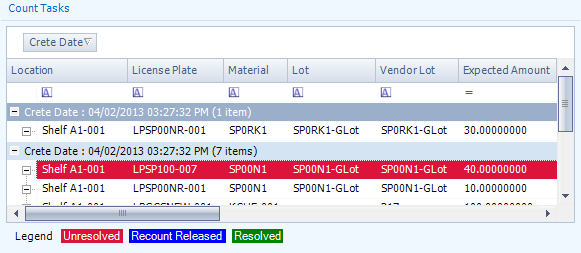
Location: The Location in which the Count occurred. License Plate: The License Plate on which the Count occurred. Material: The Material Counted in the Task. Lot: The Lot for the Material Counted in the Task. Vendor Lot: The Vendor Lot for the Material Counted in the Task. Expected Amount: The Amount of Packaged Materials Expected to be Counted.

Counted Amount: The Amount of Packaged Materials actually Counted. Package: The Packaging Type for the Material in the Count. Completed Date: The Date and time when the Count Task was completed. Employee: The name of the Footprint User who completed the Count Task. Status: The Status of the Count Task. Adjusted: A check mark will appear in this box if the Quantity had been Adjusted to Resolve the Task. Notes: Reports activity related to the Task (discrepancies, Recounts, etc.). Discrepancies occur when a Count Task is performed and the Counted Quantity is not the same as the Quantity in the system.
Displays details of a Count selected in the Count Tasks pane that has a discrepancy.
Clicking the Recount button will Release a Recount for the Task back to the floor.
Clicking the Resolve button opens a pop-up window in which you can Adjust the actual Quantity in the system, and provide a Reason Code for the Adjustment. You can also edit the Serial Numbers if necessary.
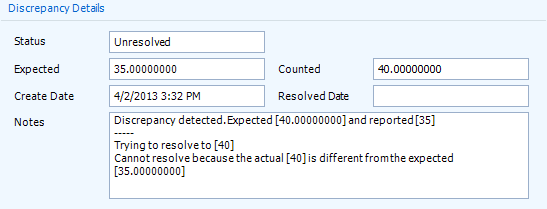
Status: The Status of the Count Task. Expected: The Amount of Packaged Materials Expected to be Counted. Counted: The Amount of Packaged Materials actually Counted. Create Date: The Date and time when the Count Task was created. Resolved Date: The Date and time when the Count Task was Resolved. Notes: Reports activity related to the Task (discrepancies, Recounts, etc.). Below the Discrepancy Details is a list of the Recount Tasks.
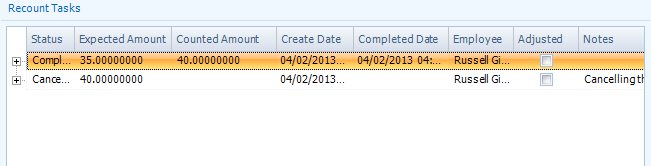
Status: The Status of the Count Task. Expected Amount: The Amount of Packaged Materials Expected to be Counted. Create Date: The Date and time when the Count Task was created. Counted Amount: The Amount of Packaged Materials actually Counted. Completed Date: The Date and time when the Count Task was completed. Employee: The name of the Footprint User who completed the Count Task. Adjusted: A check mark will appear in this box if the Quantity had been Adjusted to Resolve the Task. Notes: Reports activity related to the Task (discrepancies, Recounts, etc.).
Inconsistencies occur when a Count Task is performed and License Plate, Material, Lot, Vendor Lot, or Packaging information does not match what is in the system (this can only occur when the Physical Count has any of these set to Blind in the Settings tab).
The Inconsistencies section is where you review any Inconsistencies in completed Count Tasks.
The Inconsistencies tab is divided into three areas:
This is where you search for the Tasks to review.
Status: Select the Status of the Inconsistencies from the drop-down list. Created From: Specify a date range in which the Inconsistencies were created. Completed From: Specify a date range in which the Inconsistencies were completed. Once you've entered the appropriate criteria, click the Search button. The Cancel button will cancel the search while in progress.
Once you've search for Inconsistencies, any that exist matching the Search Criteria will populate in the Inconsistencies List area. Clicking the + icons to the left of the Inconsistency will display the details of the Inconsistency's Recounts, if applicable. This information is displayed the same as in the Count Tasks tab, described above. When a Recount Task is selected here, the Resolver pane displays the Discrepancy controls, as outlined above in the Count Tasks section.
The information in the Inconsistencies List is displayed as entered by the User who performed the Count.
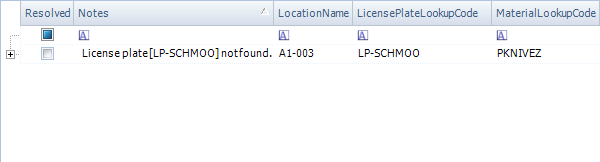
Resolved: A check mark in this box indicates the Inconsistency has been Resolved. Notes: Reports activity related to the Inconsistency, explaining where the Inconsistenc(ies) were. Location Name: The Location in which the Count occurred. License Plate LookUp Code: The License Plate on which the Count occurred. Material LookUp Code: The Material Counted in the Task.
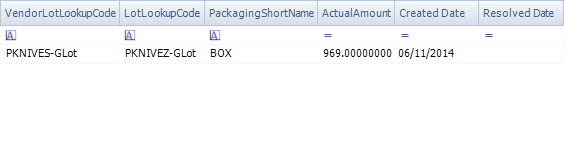
Vendor Lot LookUp Code: The Vendor Lot for the Material Counted in the Task. Lot LookUp Code: The Lot for the Material Counted in the Task. Packaging Short Name: The Packaging Type for the Material in the Count. Actual Amount: The Amount of Packaged Materials actually Counted. Created Date: The Date on which the Count Task was created. Resolved Date: The Date on which the Inconsistency was Resolved. Selecting an Inconsistency opens it in the Resolver pane.
Displays details of the open Inconsistency.
Clicking the Resolve button Resolves the Inconsistency with the information entered in the Resolver pane. Inconsistencies can only be Resolved once.
Clicking the Reset button will Release a Recount for the Task back to the floor.

Owner: The Owner of the Inventory being Counted. Project: The Project to which the Inventory being Counted belongs. Location: The Location in which the Count occurred. License Plate: The License Plate to which the Counted Inventory is assigned. Material: The Material for the Inventory being Counted. Vendor Lot: The Vendor Lot for the Inventory being Counted. Lot: The Lot for the Inventory being Counted. Packaging: The Packaging Type for the Inventory being Counted. Quantity: The number of Packaged Materials Counted.
| Last Updated: |
| 06/06/2025 |
Copyright © 2025 Datex Corporation